
Radio asking for a code after a battery change?
Recover your Honda radio code in 3 minutes
Get Radio Code
Example radio identifiers: Honda
Compare the format of your number. Enter the details from your own radio in the form, not these examples. Where can I find my radio’s serial number?
8 digits
10014744
U / L
U1001 L4744
3 letters + 8 digits
GEB29013851
Letters and digits
954LR052
Pioneer
FBPE066260EW
Pioneer
BJ001841
Blaupunkt · BP
BP5022S0692058
6 digits (Gathers)
542533
How to find your Honda radio serial number
Choose the method that matches your radio. Use the photos to recognise the unit and find the right number.
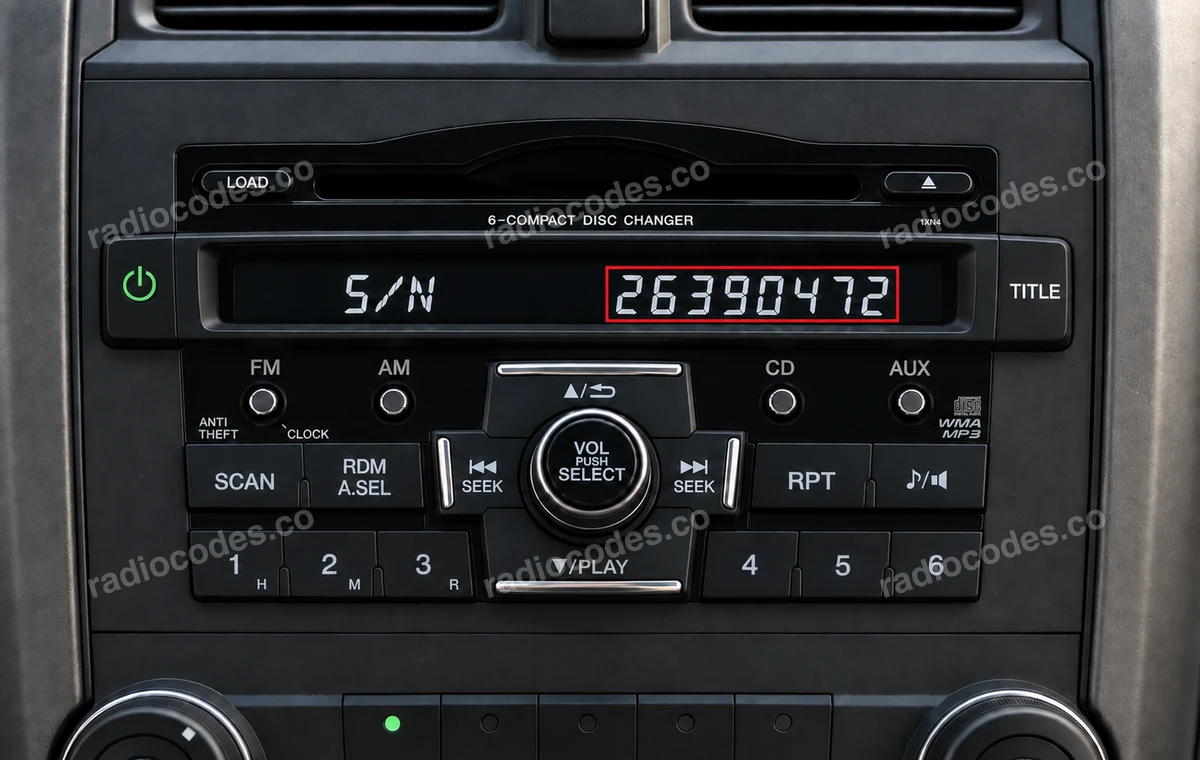
Photos are examples. Copy the number from your own radio, including its letters and zeros.
Number in the selected photo:
26390472
Radio with buttons 1–6
- Turn on the ignition and radio. When CODE appears, turn off just the radio, leaving the ignition on.
- Hold preset buttons 1 and 6. While holding them, turn on the radio using Power / PWR/VOL.
- Write down the number displayed. If the display alternates between U and L, join the four digits after U to the four after L. For example, U2639 and L0472 become 26390472. Keep the zero in the second group.
- Enter the eight digits in the form. If a complete number appears beside S/N, copy that number. If you cannot display it, check the code card or the label on the casing.
No CODE message? For older radios, Honda's instructions describe removing the BACK UP fuse for one minute, then repeating the procedure. Identify the correct fuse in your vehicle's manual first; do not remove an arbitrary fuse.
Accord 2003–2007
- Set the ignition to ACC (I). Turn on the radio and check that the upper display shows CODE. Then turn off just the radio.
- Hold the upper halves of SEEK/SKIP and CH/DISC. While holding them, press and release the PWR/VOL knob.
- The display alternates between U with the first four digits and L with the last four. Write down both groups and join the digits in U-then-L order, leaving out those two letters.
- Enter the eight digits in the form. This is the audio unit's serial. If the navigation system separately asks for a code, use the “Older navigation” guide to find its serial.
This method applies to versions with these controls. Without navigation, use the 1–6 method. If CODE is missing, see the BACK UP fuse note under “Radio with buttons 1–6”. The photos illustrate the U/L display format; the panel layout depends on the radio version.
Display Audio / touchscreen
- Switch on the ignition and radio. On the appropriate panel, hold Power + MENU + day/night or Power + Eject + HOME for about 3 seconds until diagnostics appears. Use the combination that matches your unit's buttons.
- Open Detail Information & Setting → Unit Check → HMI Unit or DA Unit. Photograph Serial No. and Model. On versions without this diagnostic menu, check HOME → Info → System/Device Information → System Info.
- Exit with Back / Return and send us photos of the panel and unit details. We will check whether we can supply a code before you buy.
Not every Honda Connect or Display Audio unit is supported by our service. Menu names vary by version. Do not change diagnostic settings.
Older navigation
- Turn on the ignition and navigation screen. Hold MAP/GUIDE, MENU and CANCEL together for a few seconds until the diagnostic menu appears. If this combination does not work or one of the buttons is missing, try holding SETTINGS, INFO and BACK together for a few seconds.
- Select Detail Information & Setting → Unit Check → Navi ECU. If Unit Check is already available, start there. Other versions use Detail Information & Settings → Unit Check → ECU Info. Record the value beside Serial No., including every letter.
- Exit using Return / Back. Enter the serial in the form. If the menu differs or the buttons are missing, check the label or send us photos of the screen and panel.
The radio and navigation system can have separate serials and codes. Navi ECU shows the navigation serial. Do not select Mem Clear or other memory-clearing options. Some versions display a number beside the code entry boxes: photograph it too, and do not confuse it with the security code.
Serial on the label
- Check the code card and any stickers in the glovebox. If the serial is missing and the screen method does not work, you need access to the label on the top, side or rear of the radio.
- Take a clear photo of the entire label. Look for SERIAL NO., Serial No. or S/N. Do not use the model or part number instead, such as a number beginning with 39100 or 39101.
- Enter the complete serial from your label, keeping letters and leading zeros. If the form does not recognise it, send us the photo for checking.
Honda serials come in several formats: six or eight digits, letters mixed with digits, and longer strings. Do not use only the last few characters. Removal depends on the dashboard; ask a workshop for help if you are unfamiliar with the fittings.
Older Blaupunkt radios
- Check the radio's model name. Our catalogue includes 150R, 200R, A Concerto, Access A HES 122R, Access C HES 345R, SN7 A/B/C, ST3 and TravelPilot RNS3.
- Read the label or marking on the casing. Look for the complete serial starting with BP. The separate number beginning with 7 is a part number.
- Enter the full BP serial in the form. For code entry and confirmation, choose your exact radio model from the catalogue further down the brand page.
Honda's 1–6 method does not apply to these units. Older Blaupunkt radios use different controls to set digits and confirm the code. Their individual instruction pages remain available. The Dublin C30 label illustrates the BP serial format; it is not a factory Honda model.
Other radios / Gathers
- Photograph the whole front panel and the screen message. If you can access the label, photograph the model and complete serial number too.
- Send the photos, your car model and whether the radio or navigation system needs the code. This also applies to Gathers, imported units and radios fitted by a previous owner.
- Wait for us to confirm availability before purchasing. The radio's appearance or Honda branding alone does not confirm that its serial is supported.
Supported Gathers models: VXM-145, VXM-155, VXM-165, VXM-175, VXM-185, VXM-195, VXM-205, VXM-215. Unsupported Gathers models: VXM-142, VXM-152, VXM-164, VXM-174, VXM-184, VXM-194, VXM-204. We do not support Fujitsu or JVCKENWOOD. We do not support serials starting with 400 (with two zeros). Do not remove letters or digits to make a serial fit the form.
Use the details from your own unit. The serial number identifies the radio — it is not the security code you enter on the radio.
Honda radio code questions
The code will be provided immediately after placing the order, regardless of the time of day.
Start with the code card or a sticker in the glovebox. Many factory radios display the serial when you hold 1 and 6 while turning the radio on, without removing the unit. Navigation-equipped Accords and touchscreens use different methods. Choose your panel in the guide above; if the screen does not show the details, use the casing label.
No removal is needed if you can read the serial from the screen or documents. Otherwise, you need access to the unit's label. Factory Honda radios may be secured with screws behind console trim, so universal radio removal keys will not always work. Follow instructions for your vehicle or ask a workshop to remove it.
The guide helps identify units found in models including Civic, CR-V, Jazz, Accord, HR-V, FR-V, Fit, Odyssey, Pilot, Crosstour, Insight, S2000, Ridgeline, Legend, Prelude, Stream, Shuttle, Element. The same model and year can have different radios depending on the market and equipment. Choose the method by the unit's panel. We check code availability by serial number, not just the car's name.
Compare the serial with the screen or label. Check U/L order, zeros and letters, and make sure you used the serial rather than the part number. Send us photos of the entire label, panel and message. Include your order number if you already have one. We will check the details and help with the next step.
Keep the code with the unit's serial number. The same code belongs to the same radio when it asks for it again. If the radio is replaced, the old unit's code may not work.
Supported Gathers models: VXM-145, VXM-155, VXM-165, VXM-175, VXM-185, VXM-195, VXM-205, VXM-215. Unsupported Gathers models: VXM-142, VXM-152, VXM-164, VXM-174, VXM-184, VXM-194, VXM-204. Check the exact model designation on the front panel or label. For another Gathers model, send us a label photo showing the model and serial number so we can check it. We do not support Fujitsu or JVCKENWOOD. The gallery helps you locate the details; it does not promise a code for every radio pictured.
Our form needs the serial number of the radio or navigation unit. The VIN identifies the vehicle and cannot replace that serial, particularly if the radio has been changed. A Honda dealer may also ask for your VIN and proof of ownership.
A factory radio may ask for its security code after losing power. A flat battery or a removed fuse can cause this too. The code belongs to the unit. Check the code card in your vehicle documents first.
U marks the first four digits and L the last four. For example, U2639 + L0472 = 26390472. Enter all eight digits without losing the zero after L. S/N before eight digits means serial number. Keep letters that form part of other serials, such as BL062938 or HMB29746382.
Turn on the ignition and radio. When CODE appears, press the button for each digit of your code in order. For an example code of 23156, press 2, 3, 1, 5, 6 — once each. Many standard Honda radios use five digits and accept the code after the last digit, with no separate confirmation. If you make a mistake, complete the current sequence before entering the correct code. Use the unit's own instructions for Blaupunkt or another panel type.
On older navigation systems with a 0–9 keypad, enter the code intended for the navigation unit and select Done. These systems often use four digits; HDD/SD navigation systems and audio units may use five. Use Delete to correct an entry before confirming. Do not shorten a supplied code to fit a different screen. The navigation system may then need GPS initialisation as described in your vehicle's manual.
It means the code was not accepted. Check the unit's serial and whether you are using an audio or navigation code. On many older radios, after 10 incorrect attempts, the system must stay on for one hour with a suitable power supply before another attempt. Navigation systems can use a different procedure: check the specific unit's manual. Do not assume that switching the radio off resets the attempt counter.